

 There’s something truly magical about homemade pizza dough-the way it transforms simple ingredients into a canvas of endless culinary possibilities. Mastering the art of crafting your own dough not only elevates the flavor and texture of your pizza but also unlocks a rewarding, hands-on experience that connects you to centuries of food tradition. Whether you’re a seasoned home cook or a curious beginner, this guide will equip you with essential tips and tricks to perfect that golden crust, from mixing and kneading to rising and baking. Get ready to roll up your sleeves and embark on a tasty journey toward pizza perfection!
Choosing the Perfect Flour for Your Pizza Dough
Master the Art of Homemade Pizza Dough: Tips & Tricks begins with selecting the ideal flour, the cornerstone of a beautifully textured crust. Different flours impart unique qualities, from crispiness to chewiness, allowing you to tailor your dough to your personal preference. For that classic Neapolitan-style pizza, high-protein bread flour (12-14% gluten content) is your best friend, providing the strength and elasticity needed for a light yet sturdy base. Alternatively, a mix of all-purpose flour and Italian “00” flour delivers a tender crumb with a subtle bite, perfect for thin crust enthusiasts.
When picking your flour, look for freshly milled options if available; they boast more nutrients and better flavor. Avoid flour blends with added leavening agents or salt-pure flour is essential for consistent yeast activity and dough performance.
unlocking the Secrets of Yeast Activation and Proofing
Yeast is the living heart of your dough, and learning how to coax it into action transforms ordinary flour into a fragrant, airy masterpiece. Activate your yeast in lukewarm water (around 105°F/40°C) with a pinch of sugar to feed it. This encourages rapid fermentation, signaled by the yeast bubbling and frothing – a crucial step to avoid flat or dense dough.
Proofing the dough in a warm,draft-free environment allows yeast to work its magic,creating carbon dioxide bubbles that aerate the dough.For deeper flavor and improved texture, I recommend allowing a slow, cold proof in the refrigerator overnight. This slows fermentation, developing complex, slightly tangy notes and a wonderfully chewy crust.
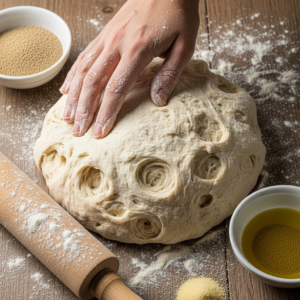
Kneading Techniques That Transform Your Dough Texture
Mastery of kneading turns your flour and water mixture into a silky, elastic dough ready to stretch and rise.Start by folding the dough onto itself and pressing with the heel of your hand. Use a rhythmic motion to stretch and strengthen gluten strands; this process typically takes 8-10 minutes by hand.
When the dough passes the “windowpane test” – a thin, translucent membrane forms when stretched gently – you know your gluten network is perfectly developed. Avoid over-kneading, which can cause a tough crust, and under-kneading, leading to a crumbly base. If you’re short on time, a stand mixer with dough hooks can achieve excellent results in 6-7 minutes.
Mastering the Ideal Rise Time for Flavor and Elasticity
Letting your dough rise to perfection enhances both flavor and texture. After kneading, cover the dough with a damp towel or plastic wrap and let it double in size in roughly 1 to 2 hours at room temperature. Patience pays off hear: a longer, slower rise offers superior elasticity and a nuanced taste profile.
Once its doubled, gently punch the dough down to release excess gas, then shape it and allow a secondary rise for 20-30 minutes before stretching. This final proof ensures a tender crumb and prevents shrinkage while baking.
Prep and Cook Time
- Prep Time: 15 minutes
- Kneading Time: 8-10 minutes
- first rise: 1-2 hours (or overnight in fridge)
- Second Rise: 20-30 minutes
- Cooking Time: 8-12 minutes at 500°F (260°C)
- Total Time: Approx. 2-3 hours (or overnight option)
Yield
Makes 2 medium-sized (12-inch) pizza crusts, serving 2-4 people.
Difficulty Level
Medium – perfect for adventurous home cooks ready to explore dough craftsmanship.
Ingredients
- 3 ½ cups bread flour (or a mix of 2 ½ cups all-purpose and 1 cup “00” flour)
- 1 cup lukewarm water (105°F / 40°C)
- 2 ¼ teaspoons active dry yeast (one 7g packet)
- 1 tablespoon sugar
- 2 teaspoons fine sea salt
- 2 tablespoons olive oil (extra virgin for best flavor)
instructions
- Activate the yeast: In a small bowl, dissolve sugar in lukewarm water, sprinkle yeast on top, and let sit for 5-10 minutes until frothy and bubbly.
- Mix dry ingredients: in a large mixing bowl, combine bread flour and sea salt. Create a well in the center.
- Combine ingredients: Pour activated yeast mixture and olive oil into the dry ingredients. Stir with a wooden spoon or your hand until a shaggy dough forms.
- Knead the dough: Transfer dough to a lightly floured surface and knead for 8-10 minutes. Use the heel of your hand to fold and press, turning the dough frequently. When smooth and elastic, pass the windowpane test.
- First rise (proofing): Lightly oil a bowl, place dough inside, cover tightly with plastic wrap or damp cloth. Let rise in a warm place for 1-2 hours until doubled in size-overnight in the fridge recommended for enhanced flavor.
- Shape and second rise: Punch down dough gently, divide into two balls, and let rest covered for 20-30 minutes. This relaxes gluten, making it easier to stretch.
- Preheat oven: Heat your oven to the highest setting (500°F/260°C) with a pizza stone or baking steel inside to mimic wood-fired heat.
- Stretch and top: on a floured surface, gently stretch one dough ball into a 12-inch circle, avoiding harsh pressing to retain air bubbles.Add your favorite sauces, cheeses, and toppings.
- Bake: Slide pizza onto the preheated stone and bake 8-12 minutes until the crust is golden and toppings are bubbly.
Chef’s Notes
- For a whole wheat option, substitute 1 cup of bread flour with whole wheat flour for added texture and nutrition.
- If yeast activation doesn’t bubble, discard and start over with fresh yeast to prevent dough failure.
- Cold fermentation improves flavor but requires planning; dough can be stored in the fridge up to 24 hours or frozen for up to 1 month.
- Use your hands rather of a rolling pin to preserve airiness and avoid compressing the dough too much.
- For a crispier crust, lightly brush olive oil along the edges before baking.
Serving Suggestions
Serve your homemade pizza with a sprinkle of fresh basil leaves and a drizzle of high-quality extra virgin olive oil. Complement with a simple arugula and cherry tomato salad tossed in lemon vinaigrette for a refreshing side. For extra pizzazz, offer crushed red pepper flakes and shaved Parmesan on the table. A glass of chilled Italian white wine or sparkling water with a lemon wedge perfectly balances the bold flavors.

| Nutrient | Per Serving |
|---|---|
| Calories | 280 kcal |
| protein | 9 g |
| Carbohydrates | 55 g |
| Fat | 4 g |
Explore more about pizza styles and baking techniques in our Best Pizza Sauces and Toppings article. For deeper understanding of yeast science and dough fermentation,the King Arthur Baking Guide is an excellent resource.
Q&A
Q&A: Master the Art of Homemade Pizza Dough – Tips & Tricks
Q1: Why should I make my own pizza dough instead of buying pre-made?
A1: Homemade pizza dough is like a blank canvas for culinary creativity. It’s fresher, free from preservatives, and lets you control every ingredient. Plus,nothing beats the satisfaction (and aroma) of kneading your own dough and pulling a gorgeous,golden crust from the oven. It’s an experience that transforms pizza night into an art form!
Q2: What’s the secret to getting that perfect crust-crispy outside, chewy inside?
A2: It’s all about hydration, fermentation, and temperature. Use just enough water to hydrate the flour without making the dough sticky. Allow your dough to ferment slowly-ideally overnight in the fridge-to develop flavor and elasticity. bake your pizza at the highest temperature possible. A blazing hot oven mimics a wood-fired pizza oven’s magic.
Q3: Can I skip the yeast and still make good pizza dough?
A3: While yeast is king for classic dough’s rise and texture, you can experiment with alternatives like baking powder for a quicker, thinner crust. but keep in mind: yeast adds depth of flavor and that delightful chewiness that chemically-leavened dough just can’t quite match.
Q4: How long should I knead the dough, and why?
A4: kneading develops gluten-the stretchy network responsible for dough’s structure and chew. Knead for about 8-10 minutes by hand (or 5-7 minutes in a stand mixer). When the dough becomes smooth and springs back when poked, you’ve done your job. Resist the urge to rush; gluten development makes all the difference!
Q5: what’s the best flour to use for pizza dough?
A5: Look for high-protein flour like bread flour or “00” flour for authentic Italian-style dough. higher protein means more gluten, resulting in that prized chewy texture and crisp bite. All-purpose flour can work in a pinch but might yield a softer crust.
Q6: Is it really necessary to let the dough rise twice?
A6: Two rises aren’t mandatory but recommended. The first rise gets your yeast active and bubbles forming; the second-after shaping-helps relax the gluten for better stretch and a lighter crust. think of it as giving your dough time to breathe and develop character.
Q7: Any tips for rolling out dough without it sticking or tearing?
A7: Channel your inner pizza chef: dust your work surface and rolling pin lightly with flour to prevent sticking-too much flour can toughen the dough, so use sparingly. Alternatively, stretch the dough gently with your hands for a more rustic, airy crust. Patience is your best tool here!
Q8: Can I freeze homemade pizza dough?
A8: Absolutely! Divide your dough into portions, wrap tightly in plastic wrap, and freeze for up to 3 months. When ready to use, thaw in the fridge overnight, then bring to room temperature before shaping. Convenience meets craftsmanship.
Q9: How do I know when the dough has “proofed” enough?
A9: Use the “poke test”: gently press your finger into the dough. If the indentation springs back slowly but remains slightly, it’s ready. If it’s too speedy, the dough needs more time; if it doesn’t spring back, it’s over-proofed.
Q10: Any creative twists to elevate my basic dough recipe?
A10: Absolutely! Infuse your dough with herbs like rosemary or oregano, swap some water for beer or olive oil for extra flavor, or add a pinch of garlic powder. Play with toppings too-sometimes the crust is the perfect stage for bold, unexpected flavors!
Mastering homemade pizza dough is an art and science-embrace the process, experiment, and savor every step. Your perfect slice awaits!
Closing Remarks
whether you’re a seasoned baker or a kitchen novice, mastering the art of homemade pizza dough opens the door to endless culinary creativity. with patience, practice, and a sprinkle of these tips and tricks, you’ll transform simple ingredients into a golden, chewy canvas for your favorite flavors. So roll up your sleeves, dust off that flour, and let every batch of dough be a delicious reminder that the best pizzas start from the very first knead. Happy baking!