There’s something truly magical about the aroma of a freshly baked apple pie wafting through the kitchen-crisp, buttery crust hugging tender, cinnamon-spiced apples, promising a bite of comfort and nostalgia in every mouthful.Yet, mastering this classic dessert from scratch can feel like an elusive art, a delicate balance between technique and intuition. In this step-by-step guide, we’ll unravel the secrets behind crafting the perfect apple pie, transforming simple ingredients into a timeless masterpiece.Whether you’re a seasoned baker or a curious novice, get ready to roll up your sleeves and discover how to create a slice of homemade heaven that’s as rewarding to make as it is to savor.
Mastering Apple Pie from Scratch begins by understanding the essence of each ingredient,technique,and flavor element that transforms a humble dessert into a timeless classic. From choosing the perfect apples that burst with natural sweetness to crafting a flaky crust that crumbles delicately on the tongue, every detail matters. This guide will inspire you to bake an irresistibly golden, bubbling apple pie that sings with balance and warmth.
Prep and Cook Time
- Preparation: 30 minutes
- Cooking: 50 minutes
- Total Time: 1 hour 20 minutes
Yield
Serves 8 classic slices
Difficulty Level
Medium
Ingredients
- For the crust:
- 2 ½ cups all-purpose flour, sifted
- 1 teaspoon fine sea salt
- 1 tablespoon granulated sugar
- 1 cup (2 sticks) unsalted butter, cold and cubed
- 6-8 tablespoons ice water
- for the filling:
- 6 large apples (a blend of Granny Smith and Honeycrisp), peeled, cored, and sliced ¼-inch thick
- ¾ cup granulated sugar
- ¼ cup packed light brown sugar
- 2 tablespoons all-purpose flour
- 1 teaspoon ground cinnamon
- ½ teaspoon ground nutmeg
- ½ teaspoon freshly grated lemon zest
- 1 teaspoon lemon juice
- 1 teaspoon vanilla extract
- ½ teaspoon fine sea salt
- For finishing:
- 1 egg, beaten (for egg wash)
- 1 tablespoon turbinado sugar (optional, for sprinkling)
instructions
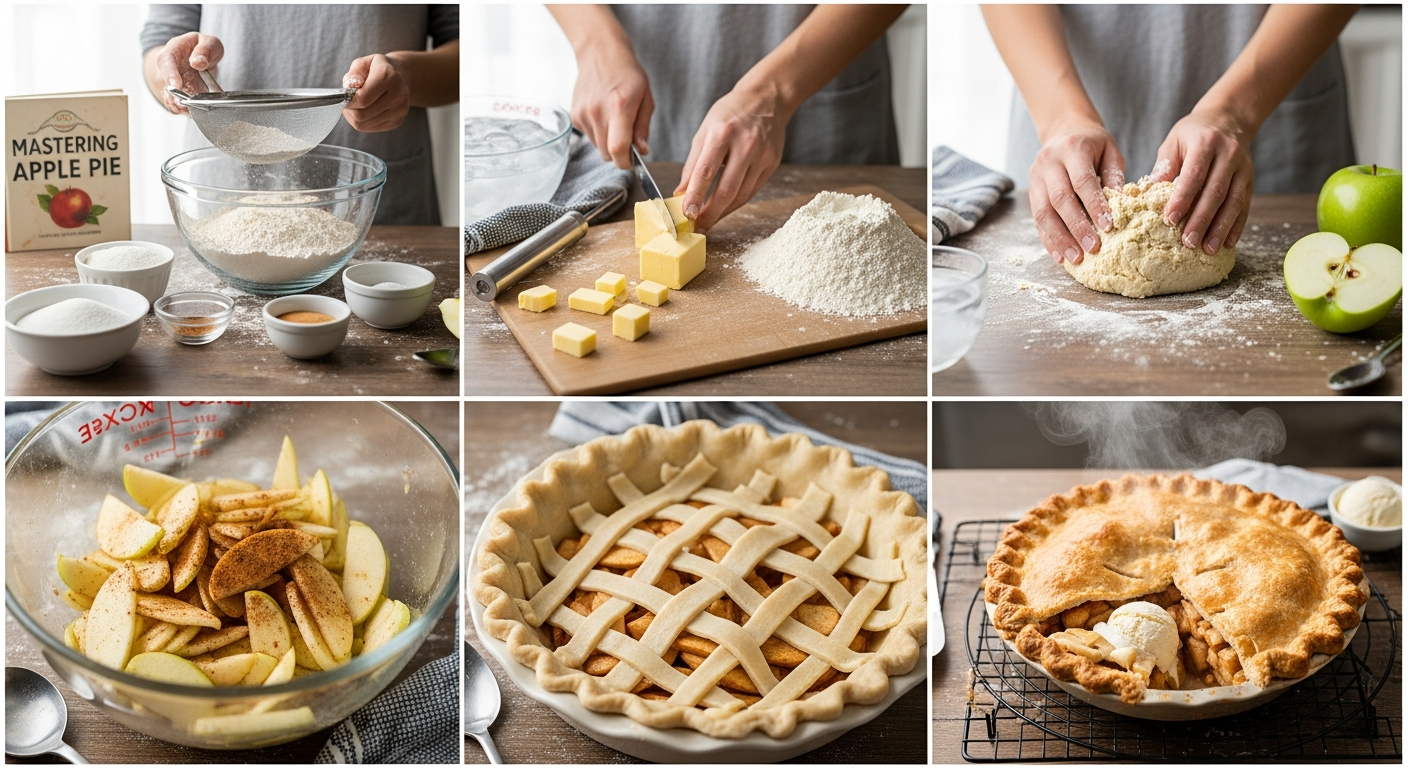
- Prepare the crust: In a large bowl, whisk together the all-purpose flour, salt, and sugar.Add the cold, cubed butter. Using a pastry cutter or your fingertips, gently work the butter into the flour until the mixture resembles coarse crumbs with pea-sized bits of butter remaining. This uneven texture creates the coveted flakiness.
- Add ice water: Drizzle 1 tablespoon of ice water at a time over the flour mixture. Use a fork to gently combine until the dough just starts to come together. Stop when you can pinch the dough together without it being wet or sticky. Divide the dough into two discs, wrap in plastic, and refrigerate for at least 1 hour.
- Prepare the filling: In a large bowl, toss the sliced apples with granulated sugar, brown sugar, flour, cinnamon, nutmeg, lemon zest, lemon juice, vanilla extract, and salt. The flour acts as a thickener, ensuring the juices create a luscious sauce rather than a soggy pie.
- Roll out the bottom crust: On a floured surface, roll out one disc of chilled dough into a 12-inch circle, about 1/8-inch thick. Carefully transfer it into a 9-inch pie pan, letting the excess dough hang over the edges. Chill again as you prepare the filling.
- Assemble the pie: Pour the apple filling evenly into the crust. Roll out the second dough disc similarly and either cover the pie with a full top crust, cutting slits for steam to escape, or create an elegant lattice. Trim excess dough to 1/2 inch and crimp the edges to seal.
- Apply egg wash: Brush the entire top crust with beaten egg and sprinkle with turbinado sugar for a sparkling finish that crisps beautifully in the oven.
- Bake: Preheat your oven to 425°F (220°C). place the pie on the center rack and bake for 20 minutes at this temperature to set the crust. Then reduce the heat to 350°F (175°C) and bake for another 30-35 minutes, or until the crust is a rich golden brown and the filling is bubbly.
- cool and serve: Let your pie cool at room temperature for at least 2 hours. This step allows the filling to thicken to the perfect consistency, ensuring every bite is a harmony of sweet, tart, and spice.
Tips for Success
- Apple selection: Combining tart and sweet apples creates depth. Granny Smith offers tang, while Honeycrisp adds crisp sweetness.
- Keep ingredients cold: Cold butter and ice water make a fluffier crust. If your kitchen is warm, briefly chill the dough again before rolling.
- Don’t overwork the dough: Handle it just enough to bring it together. Over-mixing activates gluten and leads to a tough crust.
- Vent the pie: Proper slits in the top crust prevent sogginess and allow the aroma to fill your kitchen.
- Make ahead: Pie dough can be refrigerated up to 2 days or frozen for up to a month. Apples can also be prepped and tossed with sugar and spices, refrigerated overnight for enhanced flavor.
Serving Suggestions
Serve warm slices with a scoop of creamy vanilla ice cream or a dollop of freshly whipped cream. A sprinkle of cinnamon or a drizzle of caramel sauce elevates the flavors further. Garnish with a sprig of fresh mint for a pop of color and freshness. Pair your slice with a cup of spiced chai or smooth coffee to complement the warming spices.

Nutritional details
| Nutrient | Per Serving |
|---|---|
| calories | 380 kcal |
| Protein | 3 g |
| Carbohydrates | 58 g |
| Fat | 15 g |
For more ways to perfect your pie skills, check out our Ultimate Pie Crust Techniques. For the science behind what makes apples ideal for baking, visit USA Apples’ official guide.
Q&A
Q&A: Mastering Apple Pie from Scratch: A Step-by-Step Guide
Q1: Why make apple pie from scratch instead of buying pre-made dough or filling?
A: Crafting apple pie from scratch is like painting your own masterpiece in the kitchen. You control every flavor note – from the buttery, flaky crust to the perfectly spiced, tender apple filling. It’s an experience that turns baking into an art, and the reward is a pie bursting with freshness and love that no store-bought version can match.Q2: What types of apples work best for apple pie?
A: Think of your pie as a symphony of apples. Tart varieties like Granny Smith add a sharp, tangy punch, while sweeter types like honeycrisp or Fuji bring balance and depth. Combining a few varieties creates a complex flavor profile that sings with every bite – crisp, sweet, and just the right touch of tartness.
Q3: How do I achieve a perfectly flaky pie crust?
A: The secret lies in keeping everything cold – your flour, butter, water, even the mixing bowl if possible. Cold butter creates layers in the dough that puff up beautifully when baked. Handle the dough gently and don’t overwork it, or you’ll end up with a tough crust instead of a tender, flaky one.Q4: What spices elevate an apple pie filling from ordinary to remarkable?
A: Cinnamon is the undisputed hero, but consider inviting guests like nutmeg, clove, and a pinch of allspice to your flavor party. A splash of vanilla extract or a sprinkle of lemon zest add unexpected brightness. These spices weave warmth and complexity into the filling, creating a cozy, nostalgic embrace.
Q5: How do I prevent the bottom crust from getting soggy?
A: A soggy crust is a baker’s heartbreak, but a few tricks can keep it crisp. Pre-baking (blind baking) the crust for a few minutes sets a firm base. Sprinkling a thin layer of ground nuts, breadcrumbs, or even a dusting of flour before adding the filling absorbs excess moisture.Also, using thickener like tapioca or cornstarch in the filling helps keep juices in check.
Q6: What’s the best way to vent the pie top?
A: Vents are like tiny breathers for your pie.If you’re using a solid top crust, cut decorative slits to let steam escape, preventing a soggy or bursting pie. for lattice crusts, the open-weave naturally does the job, plus it offers a stunning view of your bubbling apple masterpiece.
Q7: How long should I bake the pie, and how do I know when it’s done?
A: Bake your pie until the crust turns a luscious golden brown and the filling bubbles with joy – usually about 45 to 60 minutes at 375°F (190°C). Peek through the vents to see those bubbles; that juicy bubbling is your pie’s way of saying, “I’m ready!”
Q8: Can I make the pie ahead of time?
A: Absolutely! Apple pie often tastes even better the day after baking, as the flavors meld and deepen overnight.Simply cover it loosely with foil and store at room temperature or in the fridge. Reheat gently before serving to revive that fresh-baked aroma and texture.
Q9: What are some creative twists to try once I’ve mastered the classic apple pie?
A: Once your base is solid, get playful! Add caramel drizzle or streusel topping for extra crunch. Mix in toasted pecans or cranberries for surprising textures and flavors.Or experiment with flavored crusts – think cinnamon sugar, nutmeg, or even a touch of orange zest baked right in.
Q10: Any tips for serving and pairing apple pie?
A: Serve warm, ideally with a scoop of vanilla ice cream or a dollop of freshly whipped cream – the cold cream against the warm pie is pure magic. For beverage pairing, try a crisp apple cider, a glass of sweet riesling, or even a strong cup of black coffee to balance the indulgence.
Mastering apple pie from scratch invites you to celebrate tradition, creativity, and the simple joy of homemade baking. each step is a brushstroke on your culinary canvas – so embrace the process, savor the aromas, and enjoy every luscious slice of your masterpiece!
Insights and Conclusions
With each flaky layer and cinnamon-kissed bite, mastering apple pie from scratch becomes more than just a recipe-it’s a timeless craft that brings warmth to your kitchen and smiles to your table. armed with this step-by-step guide, you’re not just baking a dessert; you’re creating a slice of tradition, a little piece of homemade magic. So gather your apples, roll up your sleeves, and let your oven work its charm-as the best apple pie isn’t just made, it’s lovingly crafted. Here’s to many sweet successes and even sweeter memories ahead!